Water Rocket Manual
Everything You Ever Wanted to Know About Water Rockets and Launchers
Free Water
Rocket and
Launcher Plans
Get your free detail plans for a water rocket with fin templates, and a launch tube type launcher with a Clark cable tie release complete with parts list, and detailed step-by-step instructions anyone can follow.
Add your name and email to the form at the bottom of the home page and hit "Submit." Click on the confirm link in the email you get (so we know you ordered it and not a scammer or bot) and we will then immediately send you the link to download your PDF file instructions, all 42 pages.
The final writing of the full book is nearing
completion. We'll send you an email when it is available. Some of
the chapters in the full book are:
• Building Techniques
• Advanced Building Techniques
• Recovery
• Ejection Techniques
• Designing Rockets
If you haven't already, visit my amateur rocketry website here where you can learn how to build your own rocket motor from PVC pipe with sugar and potassium nitrate KNO3) propellant called caramel candy propellant or rcandy (for rocket candy).
Bottle Profiles
What are they for?
When you build a water rocket, you need to attach fins to the bottle near the neck which is almost always. For stability, you need fins and as a rule of thumb, you need them as far back as you can easily and practically get them. This means swept back fins that extend beyond the neck of the bottle where the bottle lid was. This also means unless you are using extension spars, you need to attach them to the portion of the bottle that is tapering down to the neck from the main part. This area is seldom straight so cutting fins to mate to that curving surface is usually a trial and error, trim-fit-trim-fit, process and that process is rarely quick and easy nor does it usually result in a nice, full-contact attach area.
With the profile of the bottle laid out on a grid, you can easily design your fins so that when you cut them out, they match the bottle profile perfectly the first time with no trimming unless you didn't follow the cutout lines closely.
You can also cut out the contour of the bottle and use the outside of what you cut to check bottle contours to see if they match a bottle not listed before making fins. There seems to be one very common profile for 2-liter bottles because Pepsi, Squirt, 7-Up, and Safeway are all the same bottle profile. Other times, profiles will be very close but not identical.
How are bottle profiles obtained?
People have tried all kinds of ways to get profiles such as using right triangles and a flat surface, taking circumference measurements at intervals, dividing them bi pi, and plotting them on a grid, etc. I have seen it suggested broadly to just use a light and trace the shadow. This is almost right except that you must use the sun as your light source unless you have a powerful light a long ways away or can focus a light to parallel beams (no easy method).
Light sources within reasonable distances of your bottle will fan out in all directions from the filament of the incandescent bulb or the tube or bulb surface from florescent and similar light sources causing distortion of the projected image. The sun is so far away that the light rays reaching earth are parallel for all practical purposes and so project an accurate image as demonstrated below.
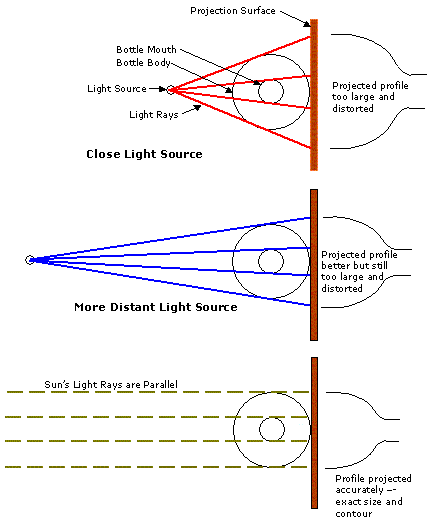
So the best way is to set the bottle on a board with a paper attached to the board, align the board so it is exactly perpendicular to the sun's rays, and then you have a perfect shadow that can be traced. If the board is not perpendicular then the profile will also be distorted.
A good way to insure the board is exactly perpendicular to the sun is to drill a hole in the board with a drill press so that it is exactly perpendicular to the board and then press a dowel into the whole. Then you can prop up the board and adjust it so there is no shadow. A block of wood with exactly perpendicular sides will also work. You just position the board so the block casts no shadow on any side of the block
Bottle Profile Fixture
Getting the initial bottle profile is pretty quick and once you have them, you don't need to do them again so the total usage time of a fixture to get profiles will be fairly short. Since it is a use once and forget (almost), it doesn't make sense to take a lot of effort making a fixture.
First Attempt
This was just a board with a dowel pin and I tried to use push pins and a paper strap to hold the bottle down. The push pins were also too hard to push into the wood and kept bending plus the paper strap would tear at the pins.
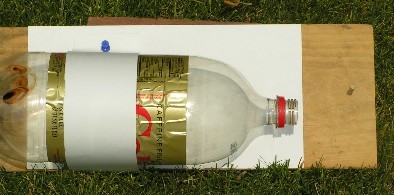
It didn't work very well because the bottle was not secured enough and would move around. Also, grass is not a good place to try to prop up the fixture, and getting a profile with the label still on does not give a very accurate profile of that area.
Second Fixture
So okay, maybe just a little more effort was in order!
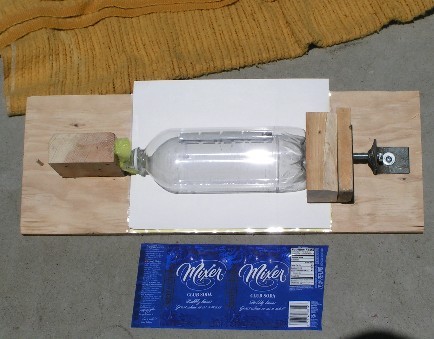
I used some scraps on a board--a block with some foam to hold the mouth of the bottle, and a screw through a piece of angle iron with a taped hole on the other end. I used blocks of various sizes between the screw and the bottom of the bottle, 1) so the screw wouldn't cut into the bottle and 2) so I could used different blocks for different lengths (heights) of bottles. This held the bottle a lot more securely--enough to easily take the profile without it moving. I taped the paper down this time instead of using push pins. Bricks were used to prop up the fixture so it could be adjusted perpendicular to the sun and this was done on concrete. The blanket in the picture was because this was done in the summer and the concrete was both hot and hard on bare knees (while wearing short pants). This time the fixture and process worked very well and profiles were obtained for all my bottles.; Note the label was properly removed this time for all profiles.
The sun moves across the sky and so your shadow will move with it. It doesn't move so fast that you can't trace a bottle outline without realigning your fixture but it does have to be realigned after a few minutes. Also, it is easiest to trace when the sun is directly overhead plus the shadow doesn't change nearly as fast as when at low elevations. So the best time is closer to noon standard time and if you really want to get particular, do it on the fall or spring equinox at noon. Just kidding, you can do it at any time but the middle part of the day is better. Guess what, this doesn't work if the sun is hiding behind a cloud either. Even thin clouds diffuse the light and make a fuzzy shadow.
Final Contour Processing
During the process I was also able to determine which bottles had the same profiles because I could line them up perfectly with previously taken profiles.
- I added a line exactly down the center of the raw profile with marks at exactly 6" or 8" depending on the bottle size. This is so the final contour could be scaled in a pdf file properly.
- The raw contour was scanned directly into Microsoft Image Composer which was bundled with FrontPage 2000 (unfortunately not later versions) at double normal size for more accurate curve plotting.
- Using a point plotting function (shapes-polygon), I plotted points around the image so that it would create a nice dark "smooth" curve accurately depicting the raw image. I created lines for the scale lines on the scanned image. The curves and lines were separate from the scanned image and the original image was not used after this point.
- The profile was reduced back to near scale size, saved as a full bottle profile in gif format, then cropped and saved as a side profile in gif format.
- A quarter inch grid was created in MS Word (for easy conversion to a pdf file) and saved as a template.
- A generated profile was inserted into the grid document, resized to the final accurate scale to match the grid, and saved as a pdf file.
Bottle Contours
Here is what the 2-liter coke bottle profile with grid looks like (not to scale) with a couple of sketch fins:
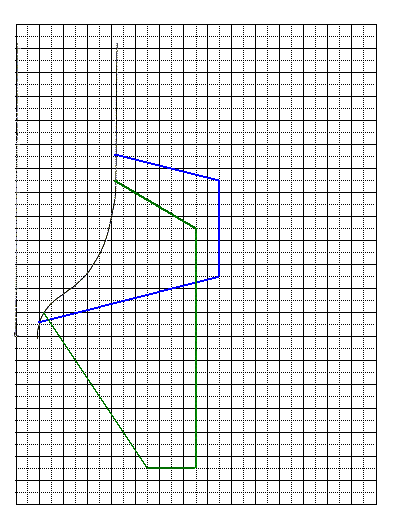
And here are those fins cut out:
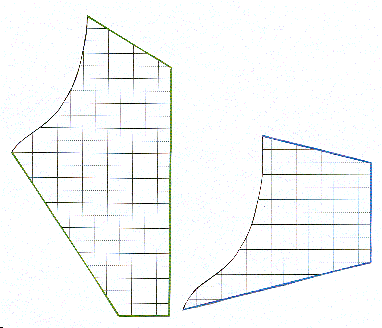
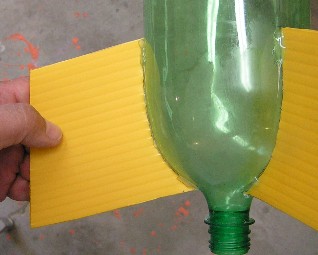
The picture below shows how well a fin fits when a bottle profile is used. Note the grain of the fin is parallel to the leading edge. Also note heavier glue (this is hot melt) at the top and bottom of the fin where the most stress is.
The following are links to bottle profiles that I have in pdf format. Just click on the links and you can open them directly in your browser (if you have installed the pdf viewer) or you can download them to your computer. The pdf files can be printed full size and will be accurate. You can then sketch your fins, cut them out, lay them on your fin material, trace around them, cut them out, and glue them to your bottle.
If you create other bottle profiles in a gif format with a scale line on them, you can send them to me at gary@waterrocketmanual.com and I will add them to the list and give you credit for them. You can also send fin patterns and I will post them here.
Usually all products from the same company and same size have the same profile, especially in the 2-liter size. Exceptions to the rule are special bottle designs such as coke and sprite. The diet versions and the standard versions have the same bottle profile such as coke and diet coke. It helps to know what company makes what product. Here is a partial list, not all necessarily come in bottles or bottles suitable for water rockets:
Pepsi: Aquafina, Brisk, Dole, Jazz, Lipton Tea, Mirinda, Mountain Dew, Mug Root Beer & Cream, Pepsi, Sierra Mist, SoBe, Starbucks, Tropicana
Coke: Barqs, Citra, Coke, Dasani, Enviga, Fanta, Fresca, Fruitopia, Full Throttle, Mellow Yellow, Minute Made, Nestea, Pibb, Sprite, Tab, Vault
Cadbury-Shweppes: 7-Up, A&W, Canada Dry, Country Time, Crush, Deja Blue, Diet Rite, Dr. Pepper, Hawaiian Punch, Hires, RC Cola, Snapple, Squirt, Sunkist,The table below is arranged by the size first, then alphabetically. For each bottle, their are two links -- side and full. The side link is the normal one you would use. The full link gives you the full bottle profile top-to-bottom, side-to-side centered on the grid in case you want more of the bottle profile or want to see what your rocket would look like with fins on both sides.The first entry is the grid with no profiles. If you need more area, you can print the grid without a profile and tape it to the grid with the profile. For the full version of a bottle, you would probably need to tape another grid sheet to both sides and maybe more on the bottom since the bottle, especially for the 2-liter bottles, takes up most of a sheet of paper.
These profiles are not perfect even though all efforts were made to make them as accurate as possible; they are accurate enough to give you a good fit and your adhesive will fill in any slight voids. If you find any profile that doesn't seem to fit, make sure you have the right profile for the right bottle and if you do, contact me and I will check the problem.
One final note on accuracy: The fins go on the neck end of a bottle and that is where the contour will be most accurate. The bottom of bottles are composed of five lobes, an odd number, so when the bottle is set up for tracing, a full lobe contour will be on one side and the other side will be between lobes so the two sides will be different. No effort was made to make the bottoms in a specific and consistent orientation.
|
IMPORTANT I cannot guarantee your printer will print to scale. Check your settings before printing, then check your grid spacing with a ruler. The full grid is 7.5" X 10", major grid lines are .5", minor .25". |
The files are all to scale and even if your printer isn't precisely to scale, it will probably print the profile close enough so fins cut from it will be a good enough fit on your bottle profile.
| Product | Size | Notes | Link |
|---|---|---|---|
| Grid | No profiles | grid | |
| Coke | 2-liter | also Fresca | side full |
| Pepsi | 2-liter | Dr. Pepper | side full |
| Crystal Geyser | 1.25 liter | "Sparkling Mineral Water" | side full |
| Coke | 1-liter | side full | |
| Crystal Cascade | 1-liter | side full | |
| Dr Pepper | 1-liter | side full | |
| Kraft Fruit20 | 1-liter | side full | |
| Pepsi | 1-liter | side full | |
| Safeway | Sparkling Water Beverage | side full | |
| Sam's Choice | 1-liter | Club Soda, Clear American | side full |
| Sparkling Fruits | 1-liter | by American Fare | side full |
| Pepsi | 24 oz | side full | |
| Dr Pepper | 24 oz | side full | |
| Coke | 20 oz | side full | |
| Sprite | 20 oz | side full | |
| Talking Rain | 17 oz | side full | |
| Perfect | 500 ml | "Empowered Drinking Water" | side full |